Erstinstallation VAT@GTC
Vorbedingungen
Bitte beachten Sie die aktuellen Softwareversionen in unseren Systemanforderungen.
JDBC Treiber für eine der folgenden Datenbanken:
Oracle: http://www.oracle.com/technology/software/tech/java/sqlj_jdbc/ (Die Treiberversion muss zur Datenbankversion passen)
Microsoft SQL Server: http://msdn.microsoft.com/data/jdbc/ (Die Treiberversion muss zur Datenbankversion passen)
Die Treiber für die Datenbank werden ab Version 22.17 nicht mehr mit ausgeliefert. Wenn Sie Unterstützung bei der Installation benötigt, dann wenden Sie sich gerne an uns.
Bereitstellung seitens Amana:
In Ihrer Auslieferung sollten Sie nach dem Entpacken der bereitgestellten ZIP-Datei folgende Ordnerstruktur vorfinden:
deployment → war-Datei mit der aktuellen Applikation
(optional) databasescript → alle notwendigen Update-Skripte für die Datenbank (wird nur noch im Sonderfall benötigt, Standardmäßig wird die Datenbank automatisch initialisiert und aktuallisiert)
Installation Apache Tomcat Server
- Wir gehen im Folgenden von einer Installation auf einem Windows Betriebssystem aus. Eine Installation auf einem Unix-artigen System unterscheidet sich lediglich in den Pfaden und dem unter 2. und 3. beschriebenen Installationsvorgang.
- Installieren Sie die empfohlene JAVA-Version und erstellen Sie entweder die Systemvariable „JAVA_HOME“, die auf das Installationsverzeichnis zeigt oder setzen in den Startskripten des Tomcats den JavaHome Pfad. Deaktivieren Sie bitte unbedingt die automatischen Java-Updates.
- Installieren Sie den Apache Tomcat Server in ein Verzeichnis Ihrer Wahl (Hinweis: zu tiefe Unterordnerstrukturen können zu Problemen mit Pfadlängen führen). Im weiteren Verlauf wird das Verzeichnis „C:\Server\Tomcat“ angenommen. Dazu im Einzelnen:
- Wir empfehlen, die Startmenüeinträge mit zu installieren, um die Konfiguration zu vereinfachen.
- Die Ports, welche der Tomcat verwendet, können nach Ihren Anforderungen angepasst werden.
Konfiguration des Tomcat Servers:
- Führen Sie nach der Installation die Applikation ->Startmenü->Tomcat->“configure tomcat“ aus.
- Führen Sie folgende Schritte durch:
- Im Fenster „General“: Stellen Sie den Start des Dienstes auf automatisch.
- Im Fenster Initial Memory Pool tragen Sie „128“ ein.
- Im Fenster Maximum Memory Pool tragen Sie ca. die Hälfte des verfügbaren physikalischen Arbeitsspeichers ein. Bedenken Sie bitte bei 32 Bit Systemen die Beschränkung des Arbeitsspeichers auf ca. 3.5 GB. Die hier konfigurierten Speichereinstellungen beeinflussen die Performance und Lauffähigkeit der Applikation. Unter Umständen sind diese bei wachsender Benutzung im Laufe der Zeit anzupassen.
- Im Fenster "Java" im Feld "Java 9 Options" den Eintrag ""--add-opens=java.base/java.util=ALL-UNNAMED" hinzufügen.
- Ggf. die Server Kodierung manuell auf UTF-8 setzen. Dafür kann der Parameter -Dfile.encoding=UTF-8 im Fenster "Java" im Feld "Java Options" gesetzt werden.
In der web.xml im conf-Verzeichnis des Tomcat Servers (%TOMCAT_HOME%/conf) muss in der servlet-Section mit dem Namen <servlet-name>jsp</servlet-name> ein <init-param> Block mit Parameter „mappedfile“ = false ergänzt werden.
web.xml<servlet> <servlet-name>jsp</servlet-name> <servlet-class>org.apache.jasper.servlet.JspServlet</servlet-class> <init-param> <param-name>fork</param-name> <param-value>false</param-value> </init-param> <init-param> <param-name>xpoweredBy</param-name> <param-value>false</param-value> </init-param> <init-param> <param-name>mappedfile</param-name> <param-value>false</param-value> </init-param> <load-on-startup>3</load-on-startup> </servlet>In der context.xml des Tomcat Servers sollte folgende Anpassung vorgenommen werden:
Wir empfehlen das Attribut cacheMaxSize des Elements Resources auf 100000 Kilobytes (100MB) zu erhöhen:
context.xml<WatchedResource>WEB-INF/web.xml</WatchedResource> <Resources cachingAllowed="true" cacheMaxSize="100000" />
- Kopieren Sie das Deployment (i.d.R "vat.war") aus dem deployment-Ordner Ihrer Auslieferung in das „webapps“ Verzeichnis im Tomcat Installationsverzeichnis.
Einrichtung Datenbank
Die Schritte zur Einrichtung sind an dieser Stelle allgemein gehalten, um den unterschiedlichen Konfigurationen der Datenbanksysteme gerecht zu werden.
- Erstellen Sie eine neue Datenbank/Datenbankschema auf dem Datenbankserver.
- Erstellen Sie einen Datenbankbenutzer mit Berechtigung für "CREATE", "INSERT", "UPDATE", "DELETE", "ALTER" auf dieser Datenbank. (Bei Oracle: CONNECT + RESSOURCE).
- Hinweis Oracle: Ab Oracle 12 muss der Oracle-Benutzer Quotas auf (s)einem Tablespace erhalten, z.B.:
ALTER USER amanavat QUOTA UNLIMITED ON amanavat;
ALTER USER amanavat QUOTA 1000M ON users; - Stellen Sie sicher, dass vom Applikationsserver aus mit diesem Benutzer auf die Datenbank zugegriffen werden kann.
- (optional) Führen Sie die in Ihrer Auslieferung enthaltenen Skripte zur Erstellung der Datentabellen aus.
Achten Sie darauf, dass dem User, der die DB-Skripte einspielt, die notwendigen Rechte zur Erstellung der Tabellenstruktur zur Verfügung stehen.
Sollte es wider Erwarten zu Fehlermeldungen bei Ausführung der Skripte kommen, kontaktieren Sie bitte unseren Support und schicken uns das Ausführungsprotokoll zu.
Durch automatische SQL-Skripte, die beim Serverstart ausgeführt werden, ist ein händischen einspielen der Skripte in der Regel nicht notwendig.
Variante 1: Konfiguration JNDI (Datasource) Datenbankverbindung mit Benutzer/Passwort
Kopieren Sie bitte den passenden JDBC Treiber in das lib-Verszeichnis des Apache Tomcat Servers (%TOMCAT_HOME%/lib).
In der context.xml des Apache Tomcat Servers muss innerhalb des <Context> Blockes ein passender Resource-Eintrag für die Datenbankverbindung angelegt werden:
Beispiel Datasource Eintrag für MSSQL:
 <Resource name="jdbc/gtcvatdatasource" auth="Container"
 	type="javax.sql.DataSource" driverClassName="com.microsoft.sqlserver.jdbc.SQLServerDriver"
    url="jdbc:sqlserver://[SERVER-ADRESS]:[PORT];DatabaseName=[DATABASE_NAME]"
    username="[USERNAME]" password="[PASSWORD]" maxTotal="20" maxIdle="10"
    maxWaitMillis="-1"/>
Beispiel Datasource Eintrag für Oracle:
 <Resource name="jdbc/gtcvatdatasource" auth="Container"
 	type="javax.sql.DataSource" driverClassName="oracle.jdbc.driver.OracleDriver"
    url="jdbc:oracle:thin:@[SERVER-ADRESS]:[PORT]:[INSTANCE]"
    username="[USERNAME]" password="[PASSWORD]" maxTotal="20" maxIdle="10"
    maxWaitMillis="-1"/>
Im Datasource Eintrag passen Sie bitte die SERVER-ADRESSE des Datenbankservers, den Datenbanknamen und Benutzer/Passwort entsprechend Ihrer aufgesetzten Datenbank an.
Variante 2: Konfiguration JNDI (Datasource) Datenbankverbindung mit Windows-User
Kopieren Sie bitte den passenden JDBC Treiber in das lib-Verszeichnis des Apache Tomcat Servers (%TOMCAT_HOME%/lib).
Die Datenbankverbindung in der context.xml des Tomcat-Servers kann alternativ über den Windows-User in dessen Kontext der Tomcat läuft aufgebaut werden. Dazu sind folgende Schritte durchzuführen:
Microsoft SSPI Treiber herunterladen (sqljdbc 7.0): https://www.microsoft.com/de-de/download/sqljdbc_7.0
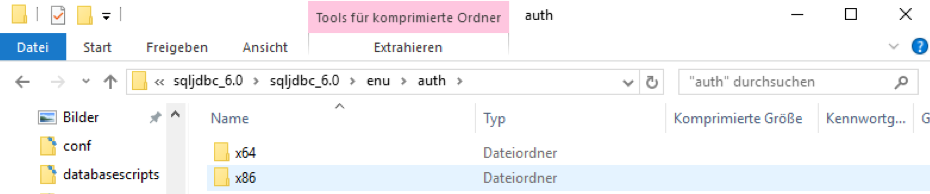
Wichtig hierbei ist verwendete JAVA Version: Bei einem 64-bit JAVA wird x64-Version des Treibers benötigt, bei einem 32-bittigen Java entsprechend die x86-Version.
Der Treiber wird in einer selbstentpackenden EXE geliefert, die bspw. per 7-Zip entpackt werden kann oder alternativ kann der Treiber als tar.gz-Archiv heruntergeladen werden.
Kopieren Sie die sqljdbc_auth.dll aus dem Unterordner "/auth" in das "\windows\system32" Verzeichnis ihrer Windowsinstallation.
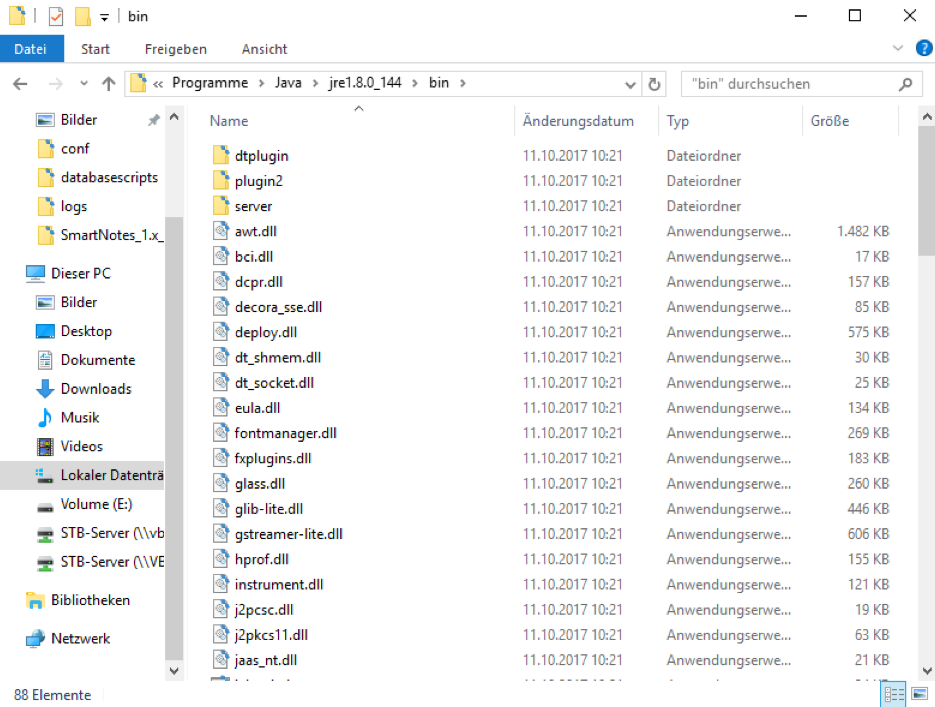
- Kopieren Sie aus dem Unterordner des Treibers "/jre8" die Datei sqljdbc42 in das "/bin"-Verzeichnis ihrer installierten JAVA-Version (die vom Tomcat verwendet wird).

In der context.xml des Tomcat-Servers muss ein passender Datasource-Eintrag für die Datenbankverbindung konfiguriert werden:
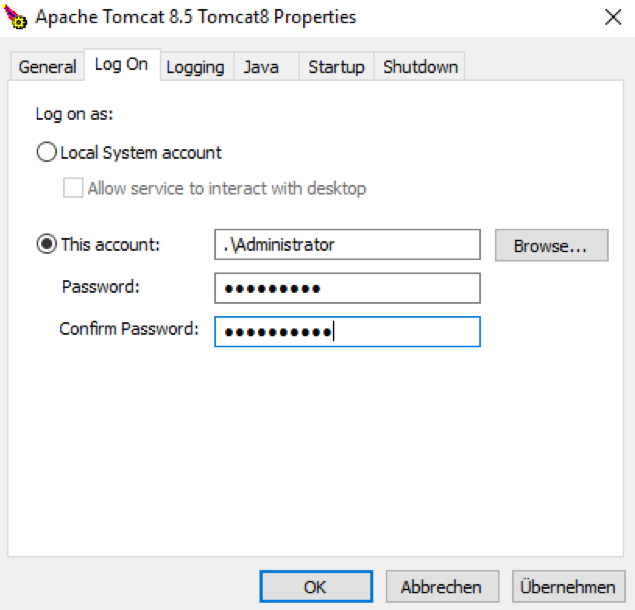
MSSQL Datasource<Resource name="jdbc/gtcvatdatasource" type="javax.sql.DataSource" driverClassName="com.microsoft.sqlserver.jdbc.SQLServerDriver" url="jdbc:sqlserver://[SERVER-NAME]\SQLEXPRESS;DatabaseName=[DATABASE_NAME];Integratedsecurity=SSPI" maxTotal="20" maxIdle="10" maxWaitMillis="-1"/>Zudem muss der Windows-User in den "Tomcat Properties" eingetragen werden - siehe Abbildung:
Bitte beachten, dass der Benutzer auch die Berechtigung hat sich als „Dienst“ anzumelden, sonst startet der Tomcat nicht mehr.
TLS-Verbindung zum SQL-Server einrichten
Ab der Treiberversion 10.x von mssql-jdbc (Microsoft SQL-Server) muss eine Verbindung ohne TLS explizit konfiguriert werden, ansonsten geht der Treiber von einer TLS-Verbindung aus und erwartet dafür vorgesehen Zertifikate.
Um diese zu deaktivieren, muss die context.xml des Tomcat-Servers wie folgt erweitert werden:
 <Resource name="jdbc/gtcvatdatasource" auth="Container"
 	type="javax.sql.DataSource" driverClassName="com.microsoft.sqlserver.jdbc.SQLServerDriver"
    url="jdbc:sqlserver://[SERVER-ADRESS]:[PORT];DatabaseName=[DATABASE_NAME];encrypt=false;trustServerCertificate=true"
    username="[USERNAME]" password="[PASSWORD]" maxTotal="20" maxIdle="10"
    maxWaitMillis="-1"/>
Entscheidend sind encrypt=false und trustServerCertificate=true in der url.
Wenn die TLS-Verbindung verwendet werden soll, dann werden folgende Informationen benötigt:
 <Resource name="jdbc/gtcvatdatasource" auth="Container"
 	type="javax.sql.DataSource" driverClassName="com.microsoft.sqlserver.jdbc.SQLServerDriver"
    url="jdbc:sqlserver://[SERVER-ADRESS]:[PORT];DatabaseName=[DATABASE_NAME];hostNameInCertificate=[HOST_NAME_IN_CERTIFICATE];trustStore=[TRUSTSTORE_LOCATION];trustStorePassword=[TRUSTSTORE_PASSWORD]
    username="[USERNAME]" password="[PASSWORD]" maxTotal="20" maxIdle="10"
    maxWaitMillis="-1"/>
Der SQL-Server muss mit einen Zertifikat abgesichert sein und dieses muss sich in einem TrustStore/KeyStore befinden. Sowohl der Pfade zum TrustStore als auch das Passwort werden mitgegeben und zusätzlich der HostName im Zertifikat.
Informationen zu den Parametern:
Informationen zum Konfigurieren:
Systemstart und Aktivierung
- Starten Sie nun den Tomcat Applikationsserver entweder unter den Systemdiensten oder mit der „Configure Tomcat“ Applikation.
- Starten Sie einen Browser und geben in die Adressleiste ein (beachten Sie den bei „Installation Tomcat“ gewählten Port):
http://<IP-Adresse oder Hostname des Applikationsservers>:[Port]/vat - Es sollte nun eine Login-Seite laden, dort können Sie sich mit
Benutzer: superuser
Passwort: test
einloggen. - Nun sollte eine Webseite Sie zur Aktivierung auffordern. Schicken Sie eine E-Mail an Ihren Ansprechpartner aus unserem Haus.
- Wir senden Ihnen die Aktivierung in Form einer Textdatei zu. Dessen Inhalt kopieren Sie bitte in das untere Textfenster und bestätigen durch Klick auf „Aktivieren“.
- Sollte bei einem der vorherigen Punkte ein Fehler auftreten, prüfen Sie bitte die unter Einrichtung der Applikation eingetragenen Parameter und nehmen Kontakt mit uns auf.
Abschließende Bemerkungen
Nach erfolgter Aktivierung des VAT@GTC ist die Installation erfolgreich abgeschlossen. Die Software kann nun den Fachabteilungen zur Benutzung oder fachlichen Tests übergeben werden.
Zum Abschluss noch einige Anmerkungen:
- Wir möchten empfehlen, eine regelmäßige Sicherung der Datenbank durchzuführen, da diese die Daten der Applikation enthält.
- Das Deployment muss nicht kontinuierlich gesichert werden. Hier reicht es, den Stand bei Auslieferung einer Version bereitzuhalten.
- Die durchgeführte Konfiguration sollten Sie dokumentieren, damit Anpassungen im Falle von Aktualisierungen des Systems oder einer Wiederherstellung nachvollzogen werden können. Insbesondere Anpassungen, die abweichend von diesem Dokument vorgenommen wurden, sind zu dokumentieren.
Preconditions
Please check the current software versions in our system requirements.
JDBC driver for one of the following databases:
Oracle: http://www.oracle.com/technology/software/tech/java/sqlj_jdbc/ (The driver version must match the database version.)
Microsoft SQL Server: http://msdn.microsoft.com/data/jdbc/ (The driver version must match the database version.)
The drivers for the database are no longer supplied as of version 22.17. If you need support by the installation, please feel free to contact us.
Provided by Amana:
You should find the following folder structure in your distribution after unpacking the provided ZIP file:
databasescript → all necessary update scripts for the database
deployment → war-file with the current application
Installation of the Apache Tomcat Server
- In the following we assume an installation on a Windows operating system. An installation on a Unix-like system differs only in the paths and the installation procedure described under 2. and 3.
- Install the recommended JAVA version and either create the system variable "JAVA_HOME" which points to the installation directory or set the JavaHome path in the Tomcat start scripts. Be sure to disable the automatic Java updates.
- Install the Apache Tomcat Server into a directory of your choice (Please note: too deep subdirectory structures can lead to path length problems). In the following the directory "C:\Server\Tomcat" is assumed. This is explained in detail:
- We recommend to install the start menu entries to simplify the configuration.
- The ports used by Tomcat can be customized to your needs.
Configuration of the Tomcat Server:
- After the installation run the application ->Start menu->Tomcat->"configure tomcat".
- Execute the following steps:
- In the "General" window: Set the start of the service to automatic.
- Enter "128" in the Initial Memory Pool window.
- In the Maximum Memory Pool window, enter about half of the available physical RAM. For 32 bit systems please consider the limitation of the RAM to approx. 3.5 GB. The memory settings configured here influence the performance and operability of the application. These may have to be adjusted over time as the use of the product increases.
- In the "Java" window, add the entry ""--add-opens=java.base/java.util=ALL-UNNAMED" in the "Java 9 Options" field.
- If necessary, set the server encoding manually to UTF-8. The parameter -Dfile.encoding=UTF-8 can be set in the "Java Options" for this.
In the web.xml in the conf directory of the Tomcat server (%TOMCAT_HOME%/conf) a <init-param> block with parameter "mappedfile" = false must be added in the servlet with name <servlet-name>jsp</servlet-name> section.
web.xml<servlet> <servlet-name>jsp</servlet-name> <servlet-class>org.apache.jasper.servlet.JspServlet</servlet-class> <init-param> <param-name>fork</param-name> <param-value>false</param-value> </init-param> <init-param> <param-name>xpoweredBy</param-name> <param-value>false</param-value> </init-param> <init-param> <param-name>mappedfile</param-name> <param-value>false</param-value> </init-param> <load-on-startup>3</load-on-startup> </servlet>- The following adjustments should be made in the context.xml of the Tomcat server:
We recommend increasing the cacheMaxSize attribute of the Resources element to 100000 kilobytes (100MB):
content.xml<WatchedResource>WEB-INF/web.xml</WatchedResource> <Resources cachingAllowed="true" cacheMaxSize="100000" />
- Please copy the deployment (usually "vat.war") from the deployment folder of your distribution into the "webapps" directory in the Tomcat installation directory.
Setting up the Database
The steps for setting up the database are kept general at this point in order to do justice to the different configurations of the database systems.
- Create a new database/database schema on the database server.
- Create a database user with permission for CREATE, INSERT, UPDATE, DELETE, ALTER on this database. (For Oracle: CONNECT + RESSOURCE).
- Pleas Note for Oracle: As of Oracle 12, the Oracle user must receive quotas on his/a tablespace, e.g:
ALTER USER amanavat QUOTA UNLIMITED ON amanavat;
ALTER USER amanavat QUOTA 1000M ON users; - Make sure that the database can be accessed from the application server with this user.
- Execute the scripts included in your distribution to create the data tables.
Make sure that the user who imports the DB scripts has the necessary rights to create the table structure.
Should, contrary to expectations, error messages occur during the execution of the scripts, please contact our support and send us the execution log.
Variant 1: Configuration of JNDI (Datasource) database connection with user/password
Please copy the appropriate JDBC driver into the lib directory of the Apache Tomcat server (%TOMCAT_HOME%/lib).
In the context.xml of the Apache Tomcat Server a corresponding resource entry for the database connection must be created within the <Context> block:
Example Datasource entry for MSSQL:
 <Resource name="jdbc/gtcvatdatasource" auth="Container"
 	type="javax.sql.DataSource" driverClassName="com.microsoft.sqlserver.jdbc.SQLServerDriver"
    url="jdbc:sqlserver://[SERVER-ADRESS]:[PORT];DatabaseName=[DATABASE_NAME]"
    username="[USERNAME]" password="[PASSWORD]" maxTotal="20" maxIdle="10"
    maxWaitMillis="-1"/>
Example Datasource entry for Oracle:
 <Resource name="jdbc/gtcvatdatasource" auth="Container"
 	type="javax.sql.DataSource" driverClassName="oracle.jdbc.driver.OracleDriver"
    url="jdbc:oracle:thin:@[SERVER-ADRESS]:[PORT]:[INSTANCE]"
    username="[USERNAME]" password="[PASSWORD]" maxTotal="20" maxIdle="10"
    maxWaitMillis="-1"/>
Please adjust the SERVER-ADRESS of the database server, the database name and the user/password in the Datasource entry according to your database.
Variant 2: Configuration of JNDI (Datasource) database connection with Windows user
Please copy the appropriate JDBC driver into the lib directory of the Apache Tomcat server (%TOMCAT_HOME%/lib).
The database connection in the context.xml of the Tomcat server can alternatively be established via the Windows user in whose context the Tomcat is running. The following steps have to be performed:
Download Microsoft SSPI driver (sqljdbc 7.0): https://www.microsoft.com/de-de/download/sqljdbc_7.0
The used JAVA version is important: A 64-bit JAVA requires the x64 version of the driver, a 32-bit Java requires the x86 version.
The driver is delivered in a self-extracting EXE, which can be unpacked e.g. by 7-Zip or alternatively the driver can be downloaded as tar.gz archive.
- Copy the sqljdbc_auth.dll from the subdirectory "/auth" into the "\windows\system32" directory of your Windows installation.
- Copy the file sqljdbc42 from the subdirectory of the driver "/jre8" into the "/bin" directory of your installed JAVA version (which is used by Tomcat).
In the context.xml of the Tomcat server a corresponding datasource entry must be configured for the database connection:
MSSQL Datasource<Resource name="jdbc/gtcvatdatasource" type="javax.sql.DataSource" driverClassName="com.microsoft.sqlserver.jdbc.SQLServerDriver" url="jdbc:sqlserver://[SERVER-NAME]\SQLEXPRESS;DatabaseName=[DATABASE_NAME];Integratedsecurity=SSPI" maxTotal="20" maxIdle="10" maxWaitMillis="-1"/>In addition, the Windows user must be entered in the "Tomcat Properties" - see illustration:
Please note that the user also has the right to log in as a "service", otherwise Tomcat will not start anymore.
Setting up a TLS connection to the SQL server
As of driver version 10.x of mssql-jdbc (Microsoft SQL server), a connection without TLS must be explicitly configured, otherwise the driver assumes a TLS connection and expects certificates provided for this.
To disable this, the context.xml of the Tomcat server must be extended as follows:
 <Resource name="jdbc/gtcvatdatasource" auth="Container"
 	type="javax.sql.DataSource" driverClassName="com.microsoft.sqlserver.jdbc.SQLServerDriver"
    url="jdbc:sqlserver://[SERVER-ADRESS]:[PORT];DatabaseName=[DATABASE_NAME];encrypt=false;trustServerCertificate=true"
    username="[USERNAME]" password="[PASSWORD]" maxTotal="20" maxIdle="10"
    maxWaitMillis="-1"/>
Crucial are encrypt=false and trustServerCertificate=true in the url.
If the TLS connection should be used, then the following information is needed:
 <Resource name="jdbc/gtcvatdatasource" auth="Container"
 	type="javax.sql.DataSource" driverClassName="com.microsoft.sqlserver.jdbc.SQLServerDriver"
    url="jdbc:sqlserver://[SERVER-ADRESS]:[PORT];DatabaseName=[DATABASE_NAME];hostNameInCertificate=[HOST_NAME_IN_CERTIFICATE];trustStore=[TRUSTSTORE_LOCATION];trustStorePassword=[TRUSTSTORE_PASSWORD]
    username="[USERNAME]" password="[PASSWORD]" maxTotal="20" maxIdle="10"
    maxWaitMillis="-1"/>
The SQL server must be secured with a certificate and this must be located in a TrustStore/KeyStore. Both the path to the TrustStore and the password are given, as well as the host name in the certificate.
Information about the parameters:
Information about configuring:
System start and activation
- Now start the Tomcat application server either under the system services or with the "Configure Tomcat" application.
- Start a browser and type in the address bar (note the port selected in "Install Tomcat"):
http://<IP address or hostname of the application server>:[Port]/vat - It should now load a login page, there you can log in with
User: superuser
Password: test - Now a web page should ask you for activation. Copy the contents of the upper text window into an e-mail and send it to your contact person in our company. Alternatively, you can click the "Request activation" button, which automatically creates an e-mail.
- We will send you the activation in the form of a text file. Please copy its content into the text window below and confirm by clicking on "Activate".
- If an error should occur with one of the previous points, please check the parameters entered under Setup of the application and contact us.
Final remarks
After the activation of the VAT@GTC the installation is completed successfully. The software can now be handed over to the relevant departments for use or specialist tests.
Finally, a few remarks:
- We recommend that you back up the database regularly, as it contains the data of the application.
- The deployment does not have to be backed up continuously. In this case it is sufficient to keep the status at the delivery of a version ready.
- You should document the configuration carried out so that adjustments can be made in the event of system updates or a recovery. In particular, adjustments that deviate from this document must be documented.