Installation mit Wizard
Schritt 0: Vorbereitung Sollte bereits eine ältere Version des TransferClient installiert sein, müssen vor der Installation folgende Schritte beachtet werden: Falls die bestehende Konfiguration weiterverwendet werden soll, müssen die beiden Konfigurationsdateien „TransferClient.exe.config“ und „TransferClient.Service.Eric.exe.config“ aus dem Installationsverzeichnis gesichert werden. Der Standard-Pfad lautet „C:\Program Files (x86)\AMANA consulting\TransferClient {Versionsnummer}“. Falls auf dem System das notwendige Microsoft .NET Framework in der Version 4.5 noch nicht installiert ist, muss dies bitte zunächst installiert werden. Die Installationsdatei dazu findet sich zum Download unter https://www.microsoft.com/de-de/download/details.aspx?id=30653. Die Installation wird mit einem Doppelklick auf die heruntergeladene Datei gestartet. Falls eine Sicherheitswarnung erscheint, muss diese mit „Ja“ bestätigt werden. Danach muss nur den Vorgaben der Installationsroutine des .NET Framework gefolgt werden. |
|
Schritt 1: Beginn Anschließend kann die alte Version des TransferClient deinstalliert und mit der Neuinstallation begonnen werden. Dazu muss das Windows Installer-Paket „TransferClient-Release-X.msi“ ausgeführt werden. |
|
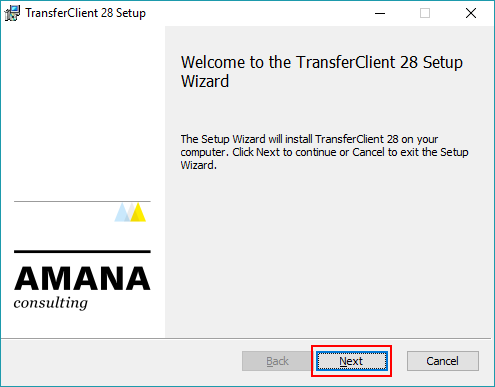
Schritt 2: Willkommensbildschirm Sind alle Voraussetzungen erfüllt, kann die eigentliche Installation des TransferClient beginnen. Hier muss nur den Vorgaben der Routine gefolgt werden, indem im Willkommensbildschirm auf „Next“ geklickt wird. |
|
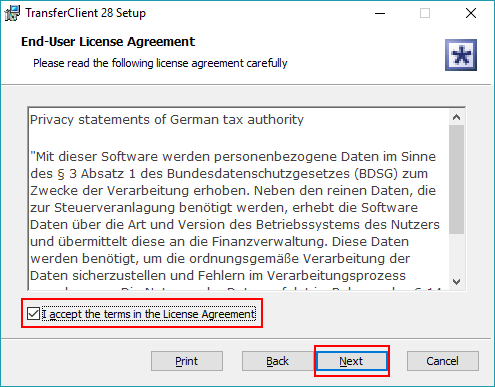
Schritt 3: Lizenzbedingungen Auf der nächsten Seite befinden sich die Lizenzbedingungen. Damit der TransferClient installiert werden kann müssen diese akzeptiert werden. Dazu muss der Haken bei „I accept the terms in the Licence Agreement“ gesetzt werden. Dann kann mit dem Klick auf „Next“ dieser Schritt abgeschlossen werden. |
|
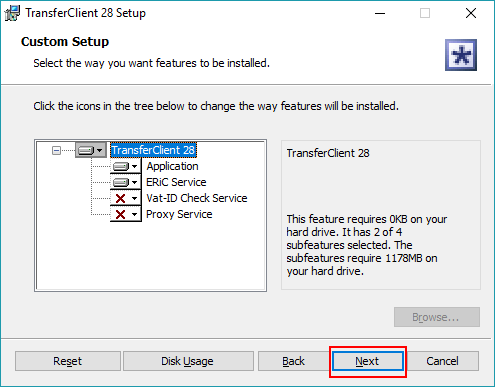
Schritt 4: Auswahl der Features Auf dieser Seite kann man die zu Installierenden Features auswählen. Vat-ID Check und Proxy Service sind standardmäßig deaktiviert. Zum Aktivieren klicken Sie auf den Button mit dem 'X' Symbol und wählen Sie eine Option aus. Mit dem Klick auf "Next" fortfahren. |
|
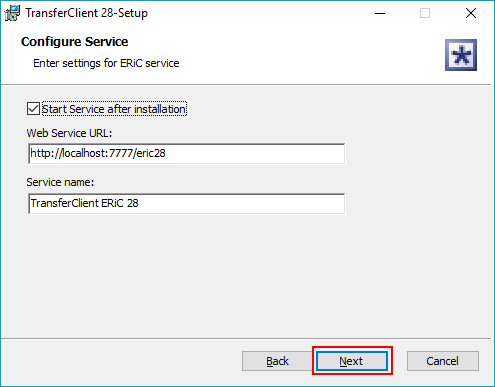
Schritt 5.1: Konfigurieren der Services Hier wird festgelegt wie die Web Service URL lautet und wie der Name des Service lauten soll. Der Haken bei "Start Service after installation" steuert, ob der Service direkt nach der Installation gestartet werden soll. Mit dem Klick auf "Next" gelangt man zum nächsten Schritt. |
|
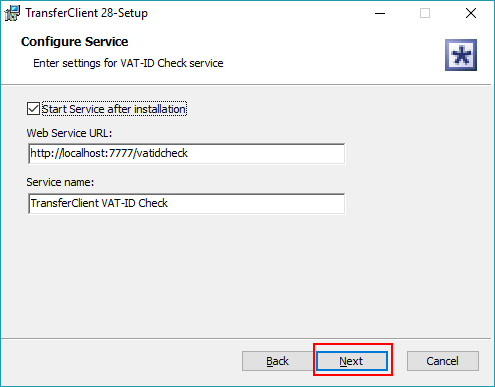
Schritt 5.2: Konfigurieren des VAT-ID Check Service Wenn ausgewählt wurde, dass auch der VAT-ID Check Service installiert werden soll, dann ist die nächste Seite die Konfigurationsseite dieses Services. Hier kann man ebenfalls eine URL eintragen und dem Service einen Namen geben. Über den Haken "Start Service after installation" wird bestimmt, ob der Service nach der Installation gestartet werden soll. Mit dem Klick auf "Next" bestätigen. |
|
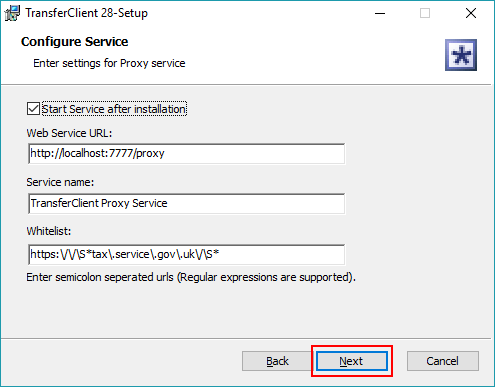
Schritt 5.3: Konfigurieren des Proxy Service Wenn ausgewählt wurde, dass auch der Proxy Service installiert werden soll, dann ist die nächste Seite die Konfigurationsseite dieses Services. Hier kann man ebenfalls eine URL eintragen und dem Service einen Namen geben. Über den Haken "Start Service after installation" wird bestimmt, ob der Service nach der Installation gestartet werden soll. Damit der Proxy Service funktioniert muss eine Whitelist eingetragen werden. Dies ist eine Liste der URLs die von dem Proxy Service erreicht werden sollen. Man kann mehrere URLs durch Semikolon getrennt eintragen und reguläre Ausdrücke verwenden. Mit dem Klick auf "Next" bestätigen. |
|
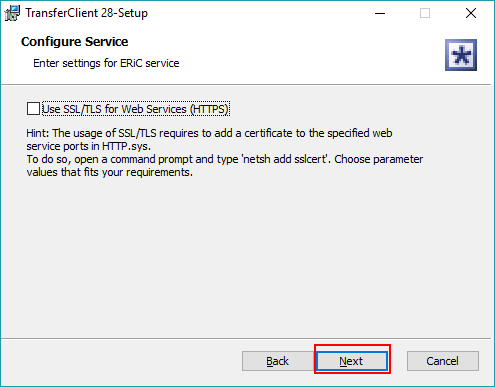
Schritt 6: SSL/TLS für Web Service verwenden Im nächsten Schritt wird festgelegt ob SSL/TLS für Web Service verwendet werden soll. Über "Next" gelangt man zur nächsten Seite. |
|
Schritt 7: Wahl des Installationsverzeichnisses Im nächsten Dialog kann der Installationspfad gewählt werden. Empfohlen wird die Installation in den vorgegeben Pfad. Mit dem Klick auf "Next" bestätigen. |
|
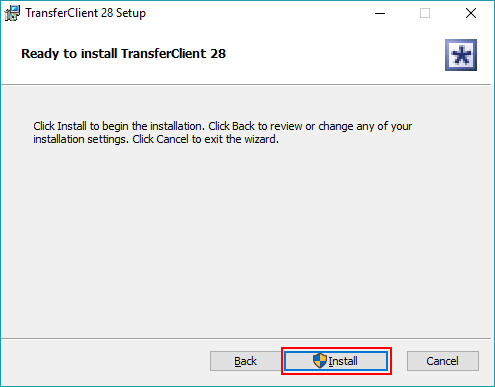
Schritt 8: Abschluss der Konfiguration Über den Knopf "Back" kann auf die vorherigen Schritte zurück gegangen werden und die Einstellungen noch einmal geändert werden. Sind alle Einstellungen korrekt kann mit einem Klick auf „Installieren“ die Installation gestartet werden. Erscheint eine Sicherheitswarnung, so ist diese ist mit „Ja“ zu bestätigen. |
|
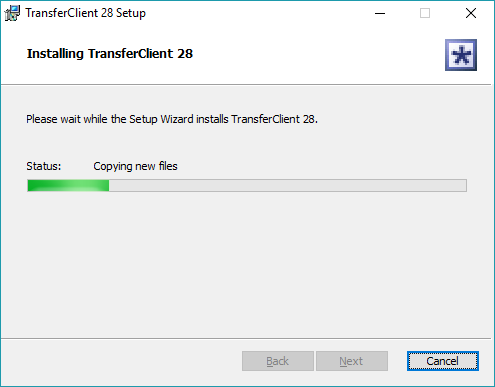
Schritt 9: Installation Jetzt wird die Installation durchgeführt. Bitte warten Sie bis die Installation abgeschlossen ist. |
|
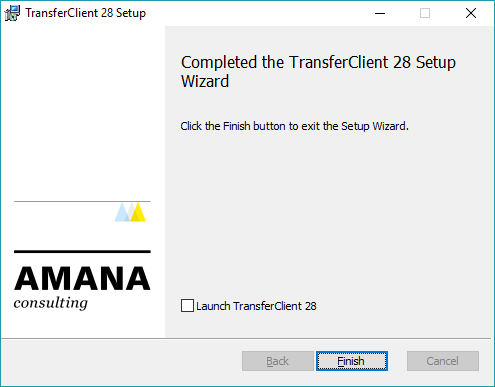
Schritt 10: Beenden des Windows-Installers Nach der Installation kann das Menü mit einem Klick auf „Finish“ beendet werden. Der TransferClient steht danach zur Benutzung bereit. |
|
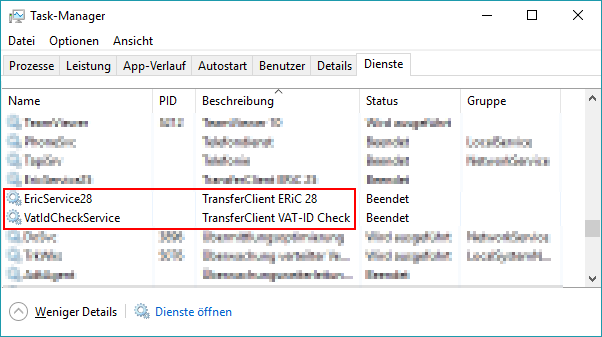
Schritt 11: Service im Task-Manager Die installierten Service sollten jetzt im Task-Manager unter "Dienste" angezeigt werden. Hier können sie gestartet oder beendet werden. |
|
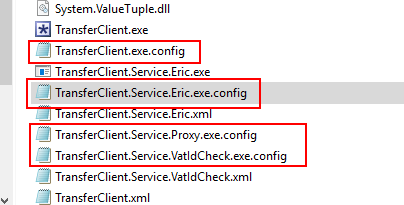


Step 0: Preparation for Installation If an older version of the TransferClient is already installed the following steps have to be considered before the installation: To save the old configuration, save the configuration files from the installation path. The standard path is „C:\Program Files (x86)\AMANA consulting\TransferClient {versionnumber}“. Please ensure the Microsoft .NET Framework version 4.5 is installed. If that is not the case, install it first. The installation file is to be downloaded under https://www.microsoft.com/de-de/download/details.aspx?id=30653. Start the installation with a doubleclick on the downloaded file. In case a security warnig shows up, confirm it with "yes". After that follow the guidelines of the installation routine of the .NET Framework. |
|
Step 1: Begin Afterwards the old version of the TransferClient can be deinstallend and the new installation can be started. For that purpose start the Windows installer-paket „TransferClient-Release-X.msi“. |
|
Step 2: Welcome screen If all precondition are fullfiled the actual installation of the TransferClient can begin. Just follow the guidelines of the routine by clicking "Next" in the welcome screen. |
|
Step 3: License Agreement On the next page are the license agreement located. They have to be accepted to install the TransferClient. The checkbox has to be checked at "I accept the terms in the Licence Agreement". After that the step is terminated with a click on "Next". |
|
Step 4: Selection of the Features On this page the required features are selected. VAT-ID Check and Proxy Service are deactivated by default. To activate a feature click on the button with a 'X' symbol and choose an option. Proceed with a click on "Next". |
|
Step 5.1: Configuration of the Services At this point Web Service URL is decided and the name of the service. The check of the checkbox "Start Service after installation" manages, if the service starts directly after the installation. Click on "Next" to proceed to the next step. |
|
Step 5.2: Configuration of VAT-ID Check Service If the feature VAT-ID Check is selected to be installed, the next page is the configuration page of the service. At this point Web Service URL is decided and the name of the service. The check of the checkbox "Start Service after installation" manages, if the service starts directly after the installation. Click on "Next" to proceed to the next step. |
|
Step 5.3: Configuration of the Proxy Service If the feature Proxy Service is selected to be installed, the next page is the configuration page of the service. At this point Web Service URL is decided and the name of the service. The check of the checkbox "Start Service after installation" manages, if the service starts directly after the installation. It has to be enlisted a whitelist so that the proxy service is functioning. That is a list of the URLs which should be reachable by the proxy service. It is possible to enter multiple URLs which are seperated by semicolon. Regular expressions are supported. Click on "Next" to proceed to the next step. |
|
Step 6: Use SSL/TLS for Web Services In the next step it is decided if the web services will use SSL/TLS. Click on "Next" to arrive at the next step. |
|
Step 7: Installation path Choose the installation path in the next dialog. Proceed with a click on the "Next"-Button. |
|
Step 8: Finish the configuration Click "Back" to review or change any of your installation settings. When all settings are correct click "Install" to begin the installation. In case a security warnig shows up, confirm it with "yes". |
|
Step 9: Installation Now the installation is realised. Please wait until the installation is completed. |
|
Step 10: Finish the Windows-Installer After the installation the wizard can be closed with a click on "Finish". The TransferClient is now ready for use. |
|
Step 11: Services in the Task-Manager The installed services should now appear in the Task-Manager under "Services". Here they can be started or ended. |
|